Sideway BICK BlogSideway BICK BLOG from Sideway

A Sideway to Sideway Home

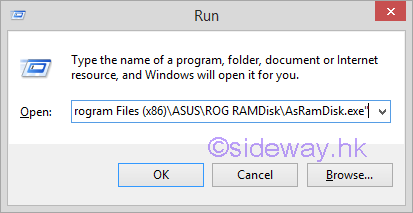
Link:http://output.to/sideway/default.asp?qno=170300015

ASUS ROG RAMDisk

ASUS ROG RAMDisk Setup

Reference:

  1. Windows 8.1 x64
  2. ASUS ROG RAMDisk V2.02.06

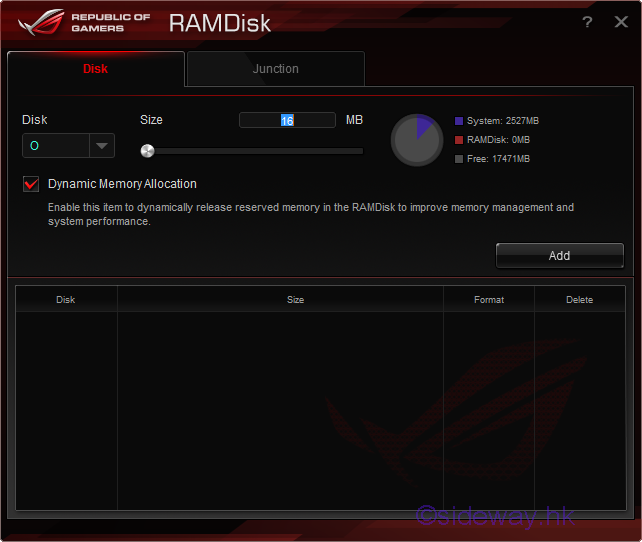
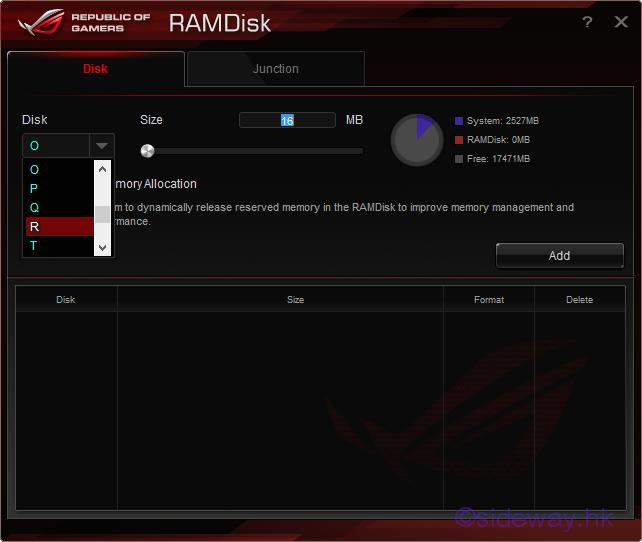
The main functions in using a ASUS ROG RAMDisk are.
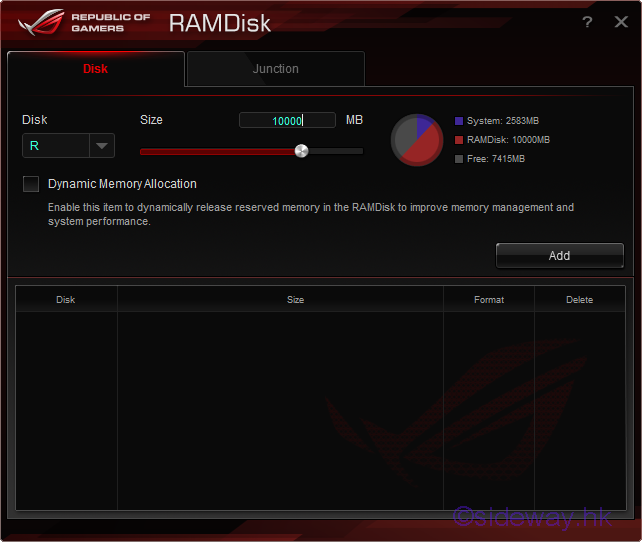
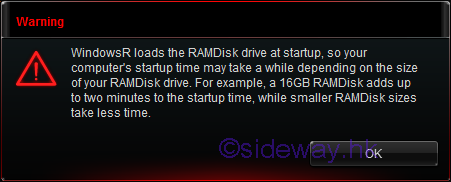
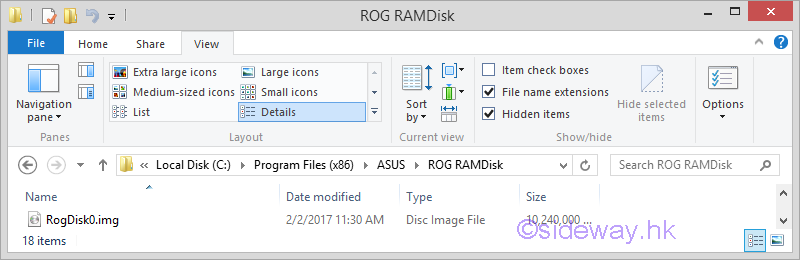
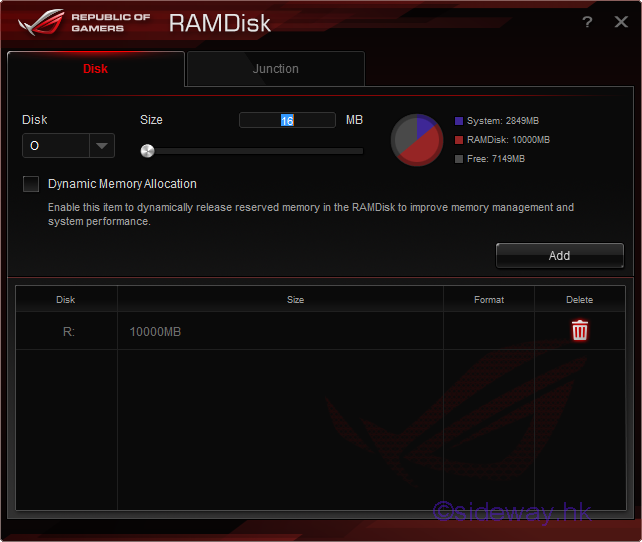
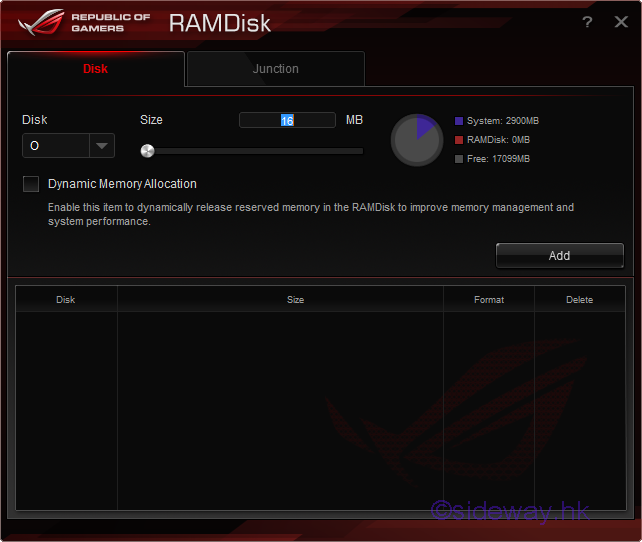
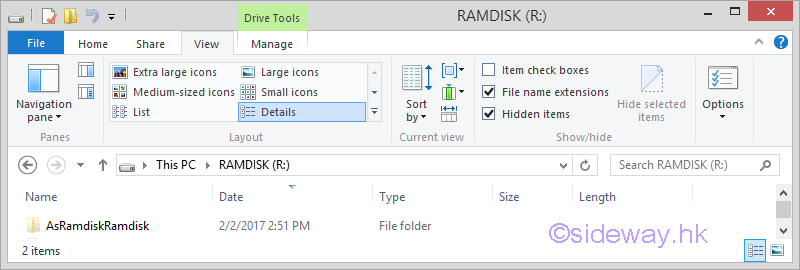
  1. Create an empty ramdisk.
  2. Delete a ramdisk.
  3. Create a junction point, and create a backup and copy the corresponding files and folders from the physical disk to the ramdisk.
  4. Delete a junction point and the corresponding backup, and restore the corresponding files and folders back to the physical disk.
  5. Synchronize the files and folders of all junction backups with the latest files and folders in the ramdisk respectively.

Create an Empty ASUS ROG RAMDisk

Steps to create an empty ASUS ROG RAMDisk .
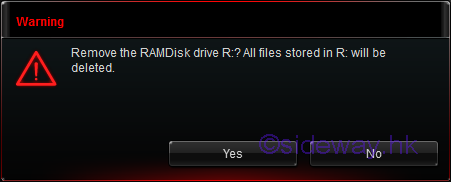
close
  1. Enter "C:\Program Files (x86)\ASUS\ROG RAMDisk\AsRamDisk.exe" to the "Open" field of "Run" window to open the "ASUS ROG RAMDisk" window.
    image
  2. Click button "OK" to open the splash window and in turn the "Disk" tab of the "ASUS ROG RAMDisk" window. 
    image
    image
  3. Expand the "Disk" drop-down list to assign the drive name of the new ramdisk.
    image
  4. Enter the prefer MB size of the new ramdisk in the "Size" field or move the slider to the right to set the MB size allocation for the new ramdisk that to be created. 
    image
  5. Uncheck the "Dynamic Memory Allocation" to fix the allocation of memory if necessary. However this is not a good choice to uncheck the "Dynamic Memory Allocation" option.
    image
  6. Click the "Add" button to create the ramdisk accordingly. 
    image
  7. Click the "OK" button to finish creating the ramdisk. 
    image
  8. After restart the computer, the backup image of the created ASUS ROG RAMDisk can be found at the installation location of ASUS ROG RAMDisk. 
    image
close

Delete an ASUS ROG RAMDiskk

Steps to delete an ASUS ROG RAMDisk .

close
  1. Enter "C:\Program Files (x86)\ASUS\ROG RAMDisk\AsRamDisk.exe" to the "Open" field of "Run" window to open the "ASUS ROG RAMDisk" window.
    image
  2. Click button "OK" to open the splash window and in turn the "Disk" tab of the "ASUS ROG RAMDisk" window. 
    image
    image
  3. Highlight the "Recycle Bin" in the "Delete" column to identify the ramdisk to be deleted.
    image
  4. Click the "Recycle Bin" of the corresponding ramdisk to delete the ramdisk accordingly. 
    image
  5. Click the "Yes" button to finish deleting the ramdisk. 
    image
close

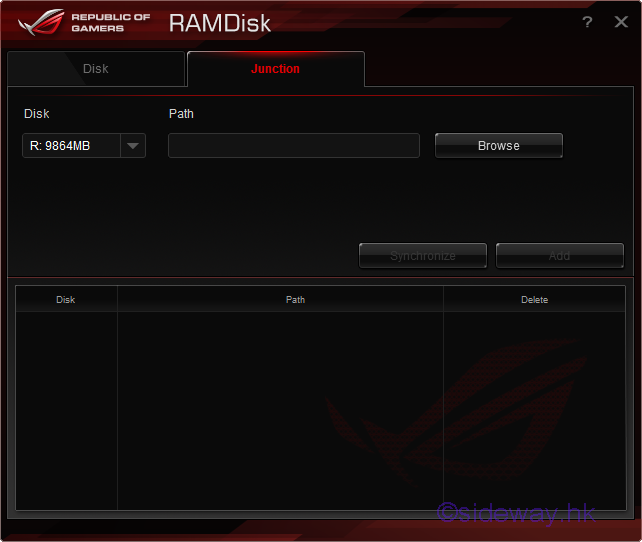
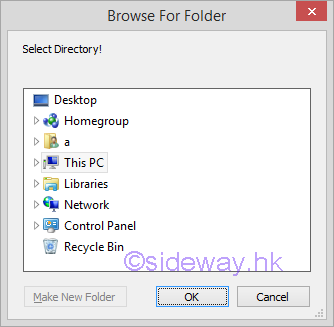
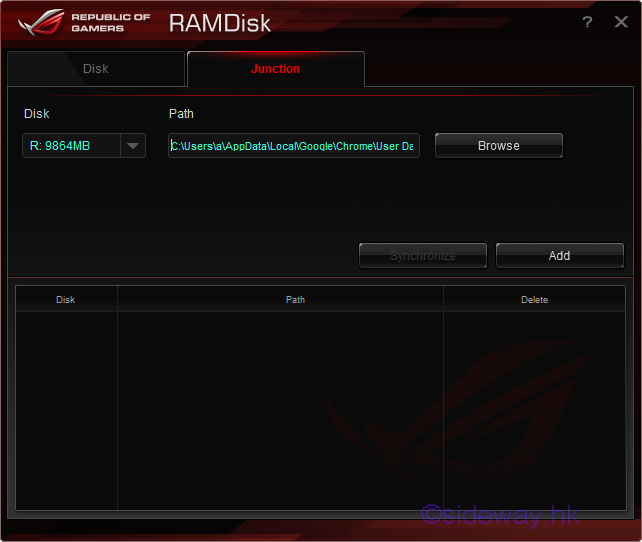
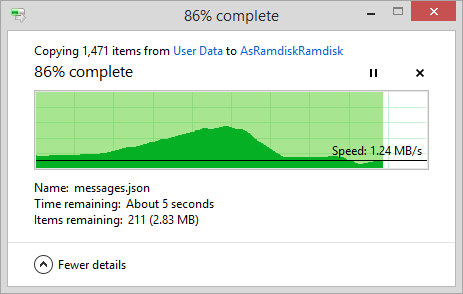
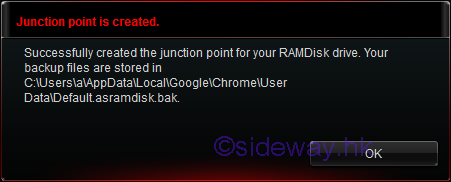
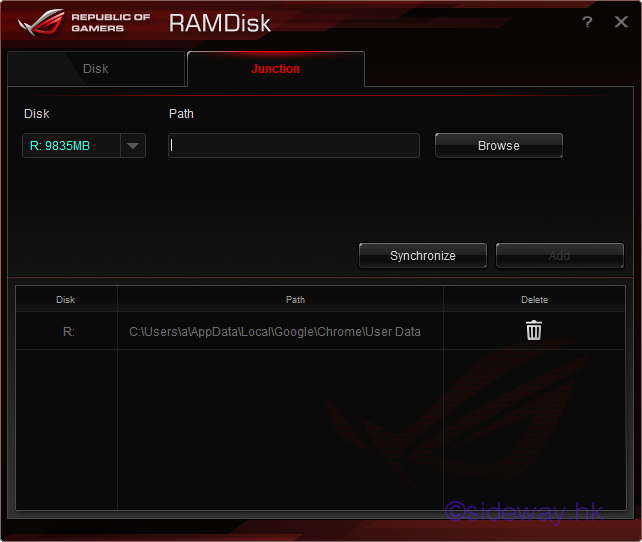
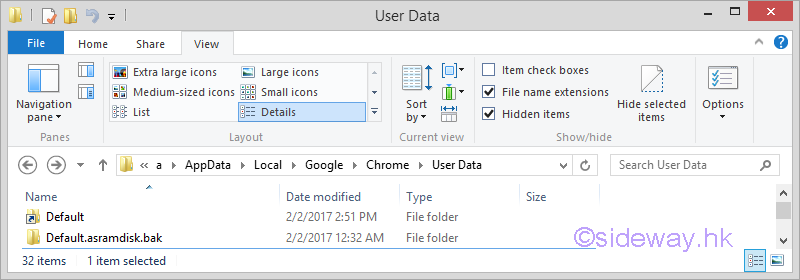
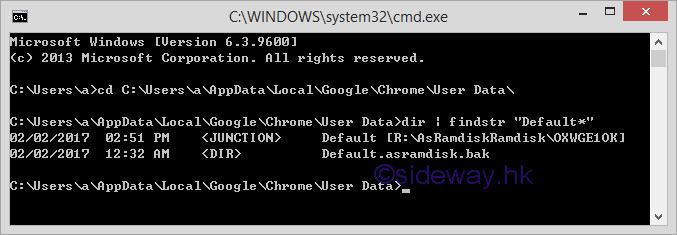
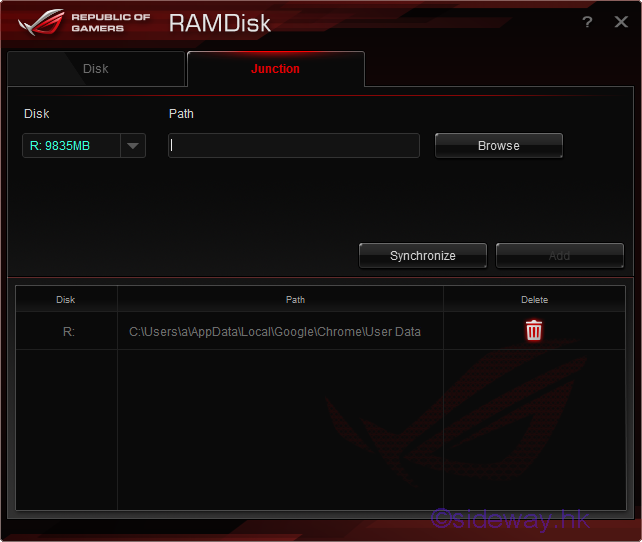
Create a Junction to an ASUS ROG RAMDisk

Steps to create a junction to an ASUS ROG RAMDisk .

close
  1. Enter "C:\Program Files (x86)\ASUS\ROG RAMDisk\AsRamDisk.exe" to the "Open" field of "Run" window to open the "ASUS ROG RAMDisk" window.
    image
  2. Click button "OK" to open the splash window and in turn the "Disk" tab of the "ASUS ROG RAMDisk" window. 
    image
    image
  3. Click the "Junction" tab button to open the "Junction" tab of the "ASUS ROG RAMDisk" window. 
    image
  4. If no ASUS ROG RAMDisk was created, the "Junction" tab of the "ASUS ROG RAMDisk" window will be a blank page.
    image
  5. Click "Browse" button to open the "Browse For Folder" window for selecting the folder. 
    image
  6. Click "OK" button in the "Browse For Folder" window to confirm the selected folder.  e.g. C:\Users\a\AppData\Local\Google\Chrome\User Data\Default\ 
    image
  7. Click the "Add" button to create the junction and backup accordingly. 
    image
  8. A notification will be displayed after successfully created the junction and backup. 
    image
  9. Click the "OK" button to finish the creation of junction. 
    image
  10. A folder is created in the ASUS ROG RAMDisk after the creation of the junction for the folder "C:\Users\a\AppData\Local\Google\Chrome\User Data\Default\"
    image
  11. The original folder "C:\Users\a\AppData\Local\Google\Chrome\User Data\Default\" is replaced by a folder junction and backuped to a "bak" folder.
    image
  12. The directory of corresponding folders are.
    image
close

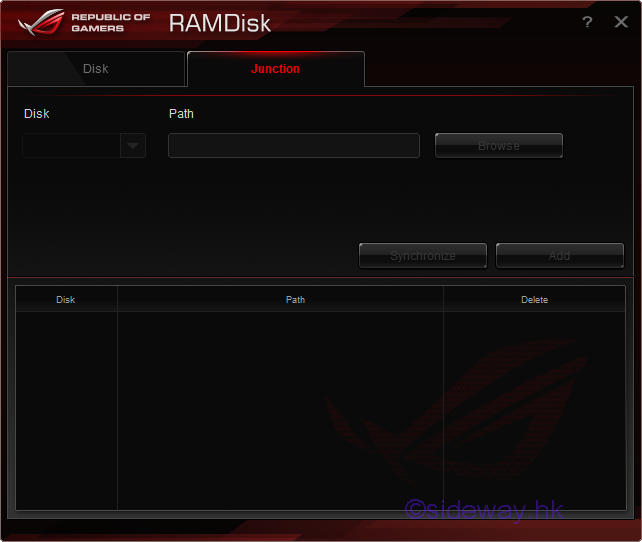
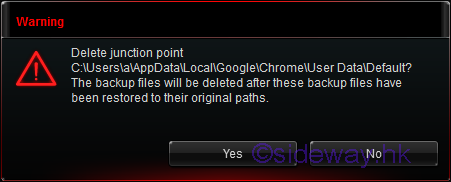
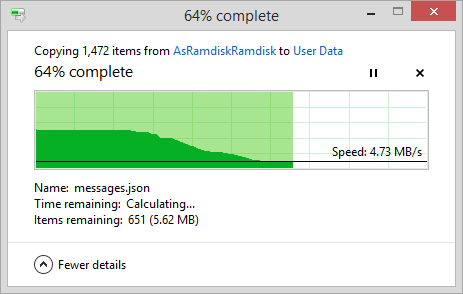
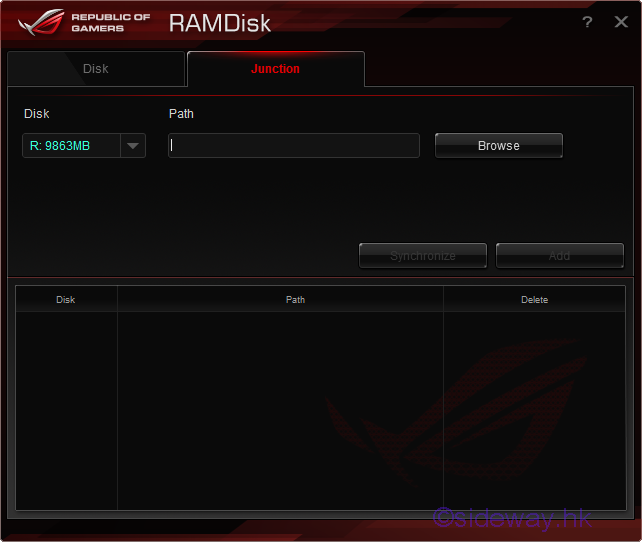
Delete a Junction of an ASUS ROG RAMDisk

Steps to delete a junction of an ASUS ROG RAMDisk .

close
  1. Enter "C:\Program Files (x86)\ASUS\ROG RAMDisk\AsRamDisk.exe" to the "Open" field of "Run" window to open the "ASUS ROG RAMDisk" window.
    image
  2. Click button "OK" to open the splash window and in turn the "Disk" tab of the "ASUS ROG RAMDisk" window. 
    image
    image
  3. Click the "Junction" tab button to open the "Junction" tab of the "ASUS ROG RAMDisk" window.
    image
  4. Highlight the "Recycle Bin" in the "Delete" column to identify the junction to be deleted.
    image
  5. Click the "Recycle Bin" of the corresponding junction to copy folder back to physical drive,  and delete the junction and backup accordingly. 
    image
  6. Click the "Yes" button to  copy folder back to physical drive, and delete the junction and backup. 
    image
  7. The "Junction Point" is deleted and the original folders and files are restored according.  
    image
close

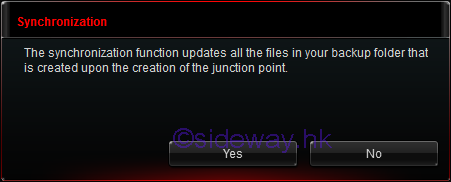
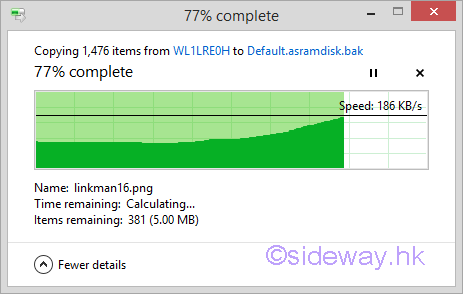
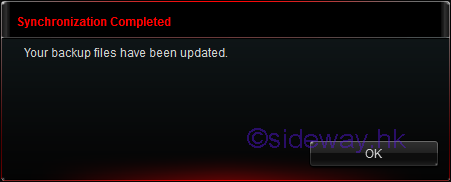
Synchronize All junction Backup Folders with an ASUS ROG RAMDisk

Steps to synchronize all junction backup folders with an ASUS ROG RAMDisk.

close
  1. Enter "C:\Program Files (x86)\ASUS\ROG RAMDisk\AsRamDisk.exe" to the "Open" field of "Run" window to open the "ASUS ROG RAMDisk" window.
    image
  2. Click button "OK" to open the splash window and in turn the "Disk" tab of the "ASUS ROG RAMDisk" window. 
    image
    image
  3. Click the "Junction" tab button to open the "Junction" tab of the "ASUS ROG RAMDisk" window.
    image
  4. Click the "Synchronize" button to synchronize all junction backup folders with the latest files and folder stored in the ASUS ROG RAMDisk.
    image
  5. Click the "Yes" button to synchronize the latest files and folder stored in the ASUS ROG RAMDiskback to the backup folders in the physical drive. 
    image
  6. A notification will be displayed after all backup files and folders are successfully updated.
    image
  7. Click the "OK" button to finish the synchronization.  
    image
close

©sidewayyy

Sideway BICK Blog

15/03


Copyright © 2000-2020 Sideway . All rights reserved Disclaimerslast modified on 26 January 2013