UEFI BIOSEZ ModeQFanMy FavoritesMain MenuAI Tweaker MenuAdvanced MenuMonitor MenuBoot MenuTool MenuExit MenuUpdating BIOS
Draft for Information Only
Content
ASUS UEFI BIOS
 Tool menu
 Items of Tool Menu
  ASUS EZ Flash 3 Utility
    Remarks
  Secure Erase

    Remarks
    Remarks
    Remarks
    Status definition
  Setup Animator
  ASUS Overclocking Profile

   Load Profile
    Remarks
   Profile Name
   Save to Profile
   Load/Save Profile from/to USB Drive
  ASUS SPD Information
  Graphics Card Information
   GPU Post
    Remarks
    Bus Interface
 Sources and References
ASUS UEFI BIOS
Tool menu
The 
Items of Tool Menu
The items of - ASUS EZ Flash 3 Utility
- Choose your background scene
- BIOS Image Rollback Support
- Publish HII Resources
- ASUS Secure Erase
- Flexkey
- Setup Animator
- ASUS User Profile
- ASIS SPD Information
- MemTest86
- ASUS Armoury Crate
- MyASUS
ASUS EZ Flash 3 Utility
This item allows you to run ASUS EZ Flash 3. When you pressRemarks
For more details, refer to section 1.11.2 ASUS EZ Flash 3.Secure Erase
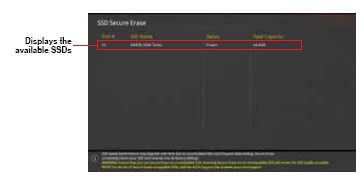
SSD speeds may lower over time as with any storage medium due to data processing. Secure Erase completely and safely cleans your SSD, restoring it to factory performance levels.Remarks
Secure Erase is only available in AHCI mode. Ensure to set the SATA mode to AHCI. Click Advanced > PCH Storage Configuration > SATA Mode Selection > AHCI. To launch Secure Erase, click Tool > Secure Erase on the Advanced mode menu.Remarks
Check the ASUS support site for a full list of SSDs tested with Secure Erase. The drive may become unstable if you run Secure Erase on an incompatible SSD.Remarks
- The time to erase the contents of your SSD may take a while depending on its size. Do not turn off the system during the process.
- Secure Erase is only supported on Intel SATA port.

Status definition
- Frozen. The frozen state is the result of a BIOS protective measure. The BIOS guards drives that do not have password protection by freezing them prior to booting. If the drive is frozen, a power off or hard reset of your PC must be performed to proceed with the Secure Erase.
- Locked. SSDs might be locked if the Secure Erase process is either incomplete or was stopped. This may be due to a third party software that uses a different password defined by ASUS. You have to unlock the SSD in the software before proceeding with Secure Erase.
Setup Animator
This item allows you to enable or disable the Setup animator. Configuration options: [Enabled] [Disabled]ASUS Overclocking Profile
This item allows you to store or load multiple BIOS settings.Load Profile
This item allows you to load the previous BIOS settings saved in the BIOS Flash. Key in the profile number that saved your BIOS settings, pressRemarks
DO NOT shut down or reset the system while updating the BIOS to prevent the system boot failure! • We recommend that you update the BIOS file only coming from the same memory/ CPU configuration and BIOS version.Profile Name
This item allows you to key in a profile name.Save to Profile
This item allows you to save the current BIOS settings to the BIOS Flash, and create a profile. Key in a profile number from one to eight, pressLoad/Save Profile from/to USB Drive
This item allows you to load or save profile from your USB drive, load and save profile to your USB drive.ASUS SPD Information
This item allows you to view the DRAM SPD information.Graphics Card Information
This item displays the information about the graphics card installed in your system.GPU Post
This item displays the information and recommended configuration for the PCIE slots that the graphics card is installed in your system.Remarks
This feature is only supported on selected ASUS graphics cards.Bus Interface
This item allows you to select the bus interface. Configuration options: [PCIEX16_1] [PCIEX16_2]Sources and References
- https://dlcdnets.asus.com/pub/ASUS/mb/LGA1151/STRIX_B250F_GAMING/E12497_STRIX_B250F-GAMING_BIOS_UM_web_only_20170706.pdf
- https://dlcdnets.asus.com/pub/ASUS/mb/LGA1151/ROG_STRIX_Z390-I_GAMING/E14477_ROG_STRIX_Z390-I_GAMING_UM_WEB.pdf
©sideway
ID: 220100027 Last Updated: 1/27/2022 Revision: 0
Latest Updated Links
- Travel Singapore Sight Space(last updated On 12/30/2025)
- Travel Singapore Sight Curiosity Cove(last updated On 12/30/2025)
- Travel Singapore Sight Night Safari(last updated On 12/30/2025)
- Travel Singapore Sight River Wonders(last updated On 12/30/2025)
- Travel Singapore Sight Rainforest Wild ASIA(last updated On 12/30/2025)
- Travel Singapore Sight Singapore Zoo(last updated On 12/30/2025)
- Travel Singapore Sight Mandai(last updated On 12/30/2025)
- Travel Singapore Sight Bird Paradise(last updated On 12/30/2025)
- Travel Singapore Sight AltitudeX(last updated On 12/30/2025)
- Travel Singapore Sight(last updated On 12/6/2025)
- Travel Singapore Rail Network(last updated On 12/5/2025)

 Nu Html Checker
  53
53  na
na  na
na
Home 5
Business
Management
HBR 3
Information
Recreation
Hobbies 9
Culture
Chinese 1097
English 339
Travel 31
Reference 79
Hardware 54
Computer
Hardware 259
Software
Application 213
Digitization 37
Latex 52
Manim 205
KB 1
Numeric 19
Programming
Web 289
Unicode 504
HTML 66
CSS 65
SVG 46
ASP.NET 270
OS 431
DeskTop 7
Python 72
Knowledge
Mathematics
Formulas 8
Set 1
Logic 1
Algebra 84
Number Theory 206
Trigonometry 31
Geometry 34
Calculus 67
Engineering
Tables 8
Mechanical
Rigid Bodies
Statics 92
Dynamics 37
Fluid 5
Control
Acoustics 19
Natural Sciences
Matter 1
Electric 27
Biology 1
